To use a tire changer, first, ensure the machine is secure and stable. Next, position the tire on the changer and use the appropriate tools to remove the tire from the rim.
Once the tire is removed, place the new tire onto the rim and use the machine to re-mount it. Using a tire changer is essential for safely and efficiently replacing tires on vehicles. Whether you are a professional mechanic or a DIY enthusiast, knowing how to use a tire changer can save you time and money.
In this guide, we will walk you through the step-by-step process of using a tire changer, from securing the machine to mounting the new tire onto the rim. By following these instructions, you can confidently change tires with ease and precision.
How To Use A Tire Changer?
Tire changing can seem like a daunting task, especially if you have never done it before. However, with the right equipment and a little know-how, you can easily change your tires and save money on trips to the mechanic. In this section, we will provide a step-by-step guide on how to use a tire changer effectively.
Why Use A Tire Changer?
Using a tire changer offers numerous benefits, such as:
- Efficiency: A tire changer saves time and effort compared to manual methods.
- Cost-effective: With a tire changer, you can change your own tires instead of paying someone else to do it.
- Convenience: You can change your tires at any time, even during weekends or holidays when shops are closed.
- Safety: Properly using a tire changer ensures that the tire is securely mounted, reducing the risk of accidents on the road.
- Control: By doing it yourself, you have better control over the entire process, ensuring that it is done correctly.
Necessary Tools And Equipment
Before starting, gather the following tools and equipment:
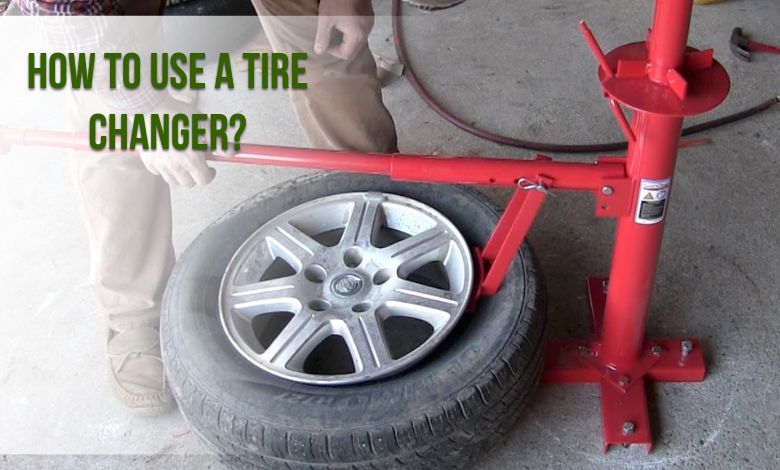
- Tire changer: This machine allows you to remove and install tires rapidly.
- Tire lubricant: Apply lubricant to make tire mounting and removal easier.
- Tire irons: These come in handy for removing tires from the rims.
- Air compressor: Ensure you have access to an air compressor for proper tire inflation.
- Safety gear: Wear gloves and safety glasses to protect yourself during the process.
Step 1: Preparing The Tire And Wheel
To begin the tire changing process, follow these steps:
- Place the tire and wheel on the tire changer machine.
- Use the tire irons to break the seal between the tire and the rim.
- Apply lubricant to the tire and rim to ease the mounting and dismounting process.
Step 2: Removing The Tire
Next, follow these steps to safely remove the tire:
- Position the tire changer’s arm or bead breaker against the sidewall of the tire.
- Activate the bead breaker lever to break the bead and separate the tire from the rim.
- Use the tire irons to pry the tire off the rim, starting from the opposite side of the tire changer arm.
Step 3: Mounting The New Tire
Once the old tire is removed, it’s time to mount the new tire:
- Place the new tire on the rim, ensuring that the bead is correctly positioned.
- Use tire irons to push the tire over the rim, starting from the opposite side of the tire changer arm.
- Continue working around the rim until the tire is fully mounted.
Step 4: Inflating And Seating The Tire
After mounting the tire, follow these steps to inflate and seat it:
- Attach the air hose to the tire valve stem.
- Begin inflating the tire gradually using the air compressor.
- As the tire inflates, ensure the tire bead is seated evenly on both sides of the rim.
- Adjust the tire pressure according to the manufacturer’s recommendations.
Step 5: Balancing The Tire
Lastly, balance the tire to ensure a smooth ride:
- Place the tire on the tire balancer, ensuring it is secure.
- Activate the balancer and let it settle.
- Make any necessary adjustments by adding or removing weights until the tire is properly balanced.
By following these steps and using a tire changer, you can confidently change your own tires. With practice, this process will become easier and quicker, saving you time and money in the long run. So, go ahead and give it a try!
How To Use A Tire Changer: A Step-by-step Guide
Tire changing can be a daunting task, especially if you’ve never done it before. However, with the right tools and a step-by-step guide, you can easily learn how to use a tire changer like a pro. We will walk you through the process of using a tire changer, from start to finish.
So let’s get started!
Step 1: Prepare The Tire Changer Equipment
Before you begin, make sure you have all the necessary equipment ready. This includes:
- Tire changer machine
- Wheel weights
- Valve stem tool
- Tire lubricant
- Safety goggles and gloves
Step 2: Safely Position The Vehicle
To ensure your safety, park the vehicle on a level surface and engage the parking brake. Additionally, place wheel chocks behind the tires to prevent any accidental movement.
Step 3: Loosen The Lug Nuts
Using a lug wrench, carefully loosen the lug nuts of the wheel that needs to be changed. It is advisable to start with a partially loosened tire for easier removal.
Step 4: Lift The Vehicle
Find a suitable lifting point on your vehicle and use a jack to elevate it off the ground. Refer to your vehicle’s manual for proper jack placement. Once the vehicle is lifted, secure it with jack stands to provide extra stability.
Step 5: Remove The Tire
Now it’s time to remove the old tire from the wheel. Follow these steps:
- Release the air pressure from the tire using a valve stem tool.
- Place the wheel on the tire changer machine and adjust the clamps or jaws to securely hold the wheel in place.
- Use the tire changer’s arm to break the bead of the tire by applying downward pressure.
Step 6: Mount The New Tire
With the old tire removed, it’s time to mount the new one. Here’s how:
- Apply a generous amount of tire lubricant to the bead area of the new tire.
- Position the new tire onto the wheel, ensuring that the valve stem aligns with the valve hole.
- Use the tire changer’s arm to align the tire bead with the wheel edge and begin mounting the tire onto the wheel.
Step 7: Balance The Wheel
To ensure a smooth ride, it’s essential to balance the wheel. Here’s what to do:
- Place the wheel on a wheel balancer.
- Attach wheel weights to the rim as indicated by the balancer readings. These weights counterbalance any uneven distribution of weight on the wheel.
Step 8: Install The Tire
Once the wheel is balanced, it’s time to reinstall it on the vehicle. Follow these steps:
- Place the newly mounted and balanced wheel onto the vehicle’s hub.
- Hand-tighten the lug nuts to secure the wheel in place.
- Lower the vehicle back onto the ground using the jack and remove the jack stands.
Step 9: Final Tightening Of Lug Nuts
Using a torque wrench, tighten the lug nuts in a star pattern to the manufacturer’s recommended specification. This helps ensure proper and even clamping force on the wheel.
Step 10: Check Tire Pressure
After completing the tire changing process, it’s crucial to check the tire pressure and inflate it to the recommended level. Use a tire pressure gauge for an accurate reading.
Now that you know the step-by-step process of using a tire changer, you can confidently tackle any necessary tire changes on your own. Remember to prioritize safety and follow the manufacturer’s instructions for your specific tire changer model. Happy tire changing!
5. Safety Tips And Best Practices
Enhance your safety while using a tire changer with these valuable tips and best practices. Follow these guidelines to ensure a smooth and accident-free tire changing process.
Using a tire changer can be a convenient and efficient way to change tires on your vehicle. However, it is important to follow proper safety precautions to ensure your own well-being and protect your vehicle from any potential damage. Here are some safety tips and best practices to keep in mind when using a tire changer:
- Proper Safety Gear: Before you begin, make sure you are wearing appropriate safety gear such as gloves and safety glasses. This will protect your hands and eyes from any potential injuries.
- Read the Manual: Familiarize yourself with the operation of the specific tire changer you are using. Read the manufacturer’s manual thoroughly to understand the machine’s safety features, operational guidelines, and any specific precautions.
- Secure the Tire Changer: Make sure the tire changer is securely anchored to the ground or platform to prevent any wobbling or instability during use. A stable machine ensures safe operation and accurate tire changes.
- Inspect Tires and Wheels: Before starting the tire changing process, inspect the tires and wheels for any visible damage, cuts, or bulges. Also, remove any heavy objects from the wheel such as wheel weights or valve caps.
- Use Proper Lifting Techniques: When lifting heavy tires and wheels, use proper lifting techniques to prevent strain or injury. Bend at your knees and use your leg muscles to lift, rather than straining your back.
- Adhere to Weight Limits: Every tire changer has a specific weight capacity. Make sure you are aware of the weight limits and never exceed them. Overloading the machine can lead to equipment failure and accidents.
- Position the Vehicle Correctly: Ensure that the vehicle is parked on a flat and stable surface. Engage the parking brake and place wheel chocks behind the opposite tires to prevent any unintended movement.
- Follow Machine Instructions: Follow the step-by-step instructions provided by the tire changer machine for safe operation. Pay attention to the recommended sequence of steps to avoid any mishaps.
- Maintain Clean Work Area: Keep your work area clean and free from any clutter or obstacles that may cause accidents. Proper organization minimizes the risk of tripping or accidentally damaging the tires or wheels.
- Seek Professional Help if Unsure: If you are unsure about any step of the tire changing process or encounter any difficulties, it is better to seek professional help. It ensures the safety of you and your vehicle.
Remember, your safety is of utmost importance when using a tire changer. By following these safety tips and best practices, you can ensure a smooth and accident-free tire changing experience.
Frequently Asked Questions
How Do You Use A Tire Changer?
To use a tire changer, start by loosening the lug nuts on the tire, then secure the tire onto the machine’s turntable. Use the machine’s arm and bead breaker to release the tire from the rim. Next, position the new tire onto the machine and use the mounting head to stretch the tire over the rim.
Finally, inflate the tire to the recommended pressure and tighten the lug nuts.
Can I Use A Tire Changer At Home?
Yes, you can use a tire changer at home. There are portable and affordable tire changers available that are designed for home use. These machines are user-friendly and come with detailed instructions on how to operate them safely. However, it is important to ensure that you have proper knowledge and take necessary precautions while using a tire changer at home.
What Are The Benefits Of Using A Tire Changer?
Using a tire changer offers several benefits. It allows you to change or replace your tires conveniently, saving you time and money. Tire changers also ensure that the tires are properly mounted and balanced, improving overall vehicle performance and safety.
Additionally, using a tire changer helps you avoid potential damages to the tire or rim that can occur during manual tire changing.
Conclusion
To wrap up, learning how to use a tire changer is an essential skill for any vehicle owner or mechanic. By following the step-by-step instructions and safety precautions outlined in this guide, you can efficiently and effectively change your tires with ease.
Remember to always prioritize safety and take your time to ensure a job well done. With practice, you’ll become a pro at using a tire changer in no time. Happy tire changing!